How to Automate Instagram Carousels With AI (Viral Templates)
How I automate Instagram carousels with AI using OpenAI, Make.com or n8n, and Blotato. One topic variable, finished carousels posted automatically.
If you want to automate Instagram carousels without designing every slide by hand in Canva, this is the exact workflow I walk through with Kevin, built once and reused for any niche. Most “AI carousel” guides stop at one ChatGPT prompt and a free template pack. This one wires OpenAI, Blotato, and either Make.com or n8n into a single automation where you change one variable, hit run, and a finished carousel posts to Instagram on the other side.
Below is the build in both Make.com and n8n, with a luxury real estate example wired in by default and an optional Airtable step for human-in-the-loop review.
How to Automate Instagram Carousels (Video Guide)
If you’d rather watch the full walkthrough, this is the video version with Kevin, who built the Make.com and n8n templates. The written guide below covers the same build with extra detail on the OpenAI system prompt, the n8n wait-loop pattern, the Airtable human-in-the-loop swap, and the hashtag gotcha that broke our first runs.
Why Most Carousel “Automation” Guides Don’t Actually Automate
Search “automate Instagram carousels” and you get two flavors of advice. One is “open Canva, duplicate a template, type your slides.” That’s manual work with extra steps. The other is “schedule a finished carousel in Later or Buffer.” That’s scheduling, not automation. Neither one solves the part that actually takes time: writing the slide copy and designing each slide.
Real automation means the workflow writes the copy, generates the visuals, and queues the post. You feed it one trigger (a topic, a row in a spreadsheet, a manual run) and a finished carousel comes out the other end. That’s what this build does.
The reason most creators don’t run this kind of automation is the visual generation step. Generic AI carousel makers output one style and the slides feel cookie-cutter. The fix is using a carousel-aware template with the latest image models, so the AI maps your prompt into a consistent multi-slide design instead of disjointed solo images.
How to Automate Instagram Carousels: The Stack
I use the same four tools across both the Make.com and n8n versions:
- OpenAI to turn a single topic variable into a structured carousel plan. The default system prompt is already strong, with a hook, three points, and a CTA baked in.
- Blotato as the carousel generator and publisher. The Create Visual module maps the OpenAI output into a finished multi-slide design using DALL-E 2 and the latest image generation models, then the Create Post module pushes it to Instagram.
- Airtable as the optional staging table for human-in-the-loop review. Swap it in whenever you want to eyeball outputs before they ship.
- Make.com or n8n as the orchestrator. Pick whichever you already have a paid seat on. Both work.
I’m involved with Blotato as a creator and tester, so take this with whatever grain of salt feels right. I use Blotato in this stack because the carousel generation is the part that turns generic AI slop into something that looks designed, and because the same node can also push the finished carousel to TikTok, Pinterest, Facebook, or LinkedIn with one tweak.
The carousel-generation step is the part that breaks most DIY builds, and it’s why every workflow in this post hands the visual and posting step to Blotato. If you want to test the full stack on your own account, start a free 7-day Blotato trial, connect Instagram, and run your first AI-generated carousel end to end. The trial covers the Create Visual carousel module and enough credits to test multiple topics, but the Create Post node runs through the API, which is a paid-plan feature: generating an API key in Settings ends the free trial and activates your paid Starter plan.
AI Workflow vs Canva vs Schedule-Only SaaS: Pick the Right Build
Before you import the template, decide if you actually need this level of automation. If you only post one carousel a week and you enjoy designing in Canva, a scheduler is fine. If you want fresh carousels generating themselves across one account or across multiple client accounts, the AI workflow earns its keep fast.
| Approach | What it does | What it can’t do | Best for |
|---|---|---|---|
| Canva + native Instagram | Manual design + manual post | No automation, no batch generation | One creator, under 2 carousels a week |
| Buffer / Later / Plann | Scheduling and analytics for carousels you already designed | Doesn’t generate slide copy or visuals | Solo brands with a designer already on payroll |
| Make.com or n8n + OpenAI + Blotato | Generates slide copy, designs slides, posts or queues for review | Can’t replace strategy or a strong hook | Creators, agencies, or small businesses running 5+ carousels a week or multiple accounts |
The AI workflow wins on volume, multi-account use, and consistency. The native and scheduling tools win if every carousel needs heavy custom design. If you’ve already wired up a similar automation for your other channels, see how the same pattern works in our Instagram Stories build and the TikTok slideshow build. Both share the OpenAI plus Blotato spine with different generation nodes swapped in.
How to Automate Instagram Carousels (Step-by-Step)
Here’s the exact flow Kevin walks through in the video. Import the template once, change one variable, and you’re live.
Step 1: Import the Make.com Template and Set Your Topic
Open the Make.com template from the video description, click the three-dot menu, and hit Import Blueprint. The scenario uses a Set Variables module at the start with a single variable called your topic. That’s the only thing you change between runs.
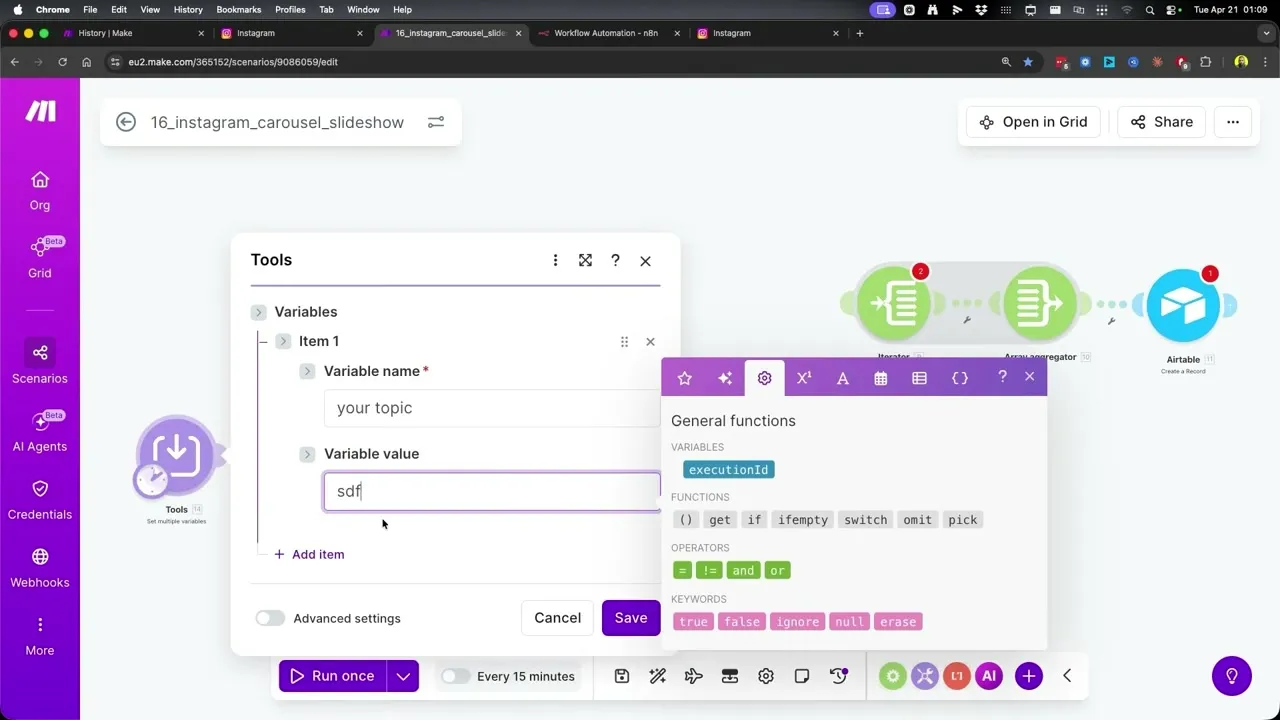
For the demo run, Kevin set the topic to “a listing agent selling a luxury waterfront home.” You can swap that for any niche: a coach selling a 12-week program, a restaurant promoting a tasting menu, a course creator launching a cohort. The OpenAI module downstream figures out the slide structure from whatever you type.
Step 2: Leave the OpenAI System Prompt Alone (At First)
The OpenAI module ships with a system prompt that’s already doing the heavy lifting. It tells the model to act as an Instagram carousel content strategist and copywriter, transform the topic into two things (a detailed carousel_prompt and a caption), and return strict JSON so the next module can parse it cleanly.
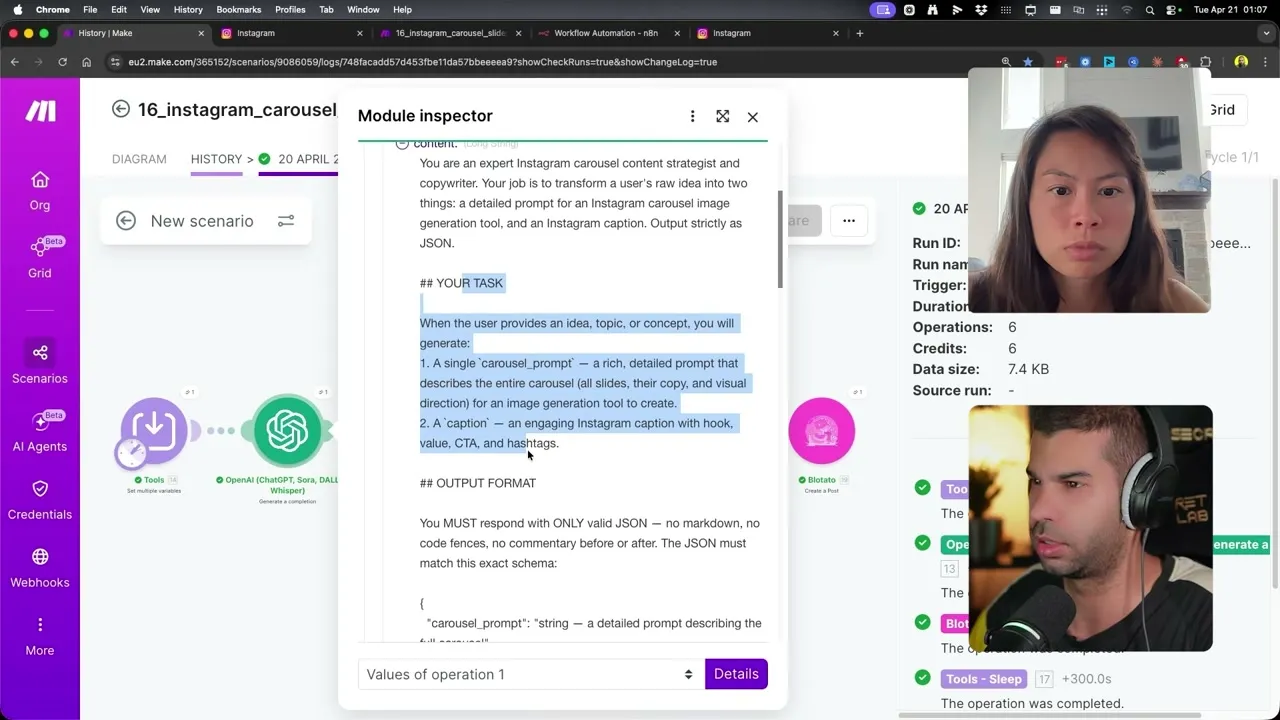
Kevin’s advice in the video: do not touch the system prompt until everything else is working. Get one clean run first. Then come back and add product details, brand voice, or audience context on top of the default prompt to make it your own.
Step 3: Connect OpenAI and Pick the Model
If you’ve already connected OpenAI to Make.com, the module auto-finds your connection. If not, hit Add, paste your OpenAI API key, and you’re set. The default model is gpt-4.1, which is the strongest non-reasoning model OpenAI offers and the right pick for structured carousel output.
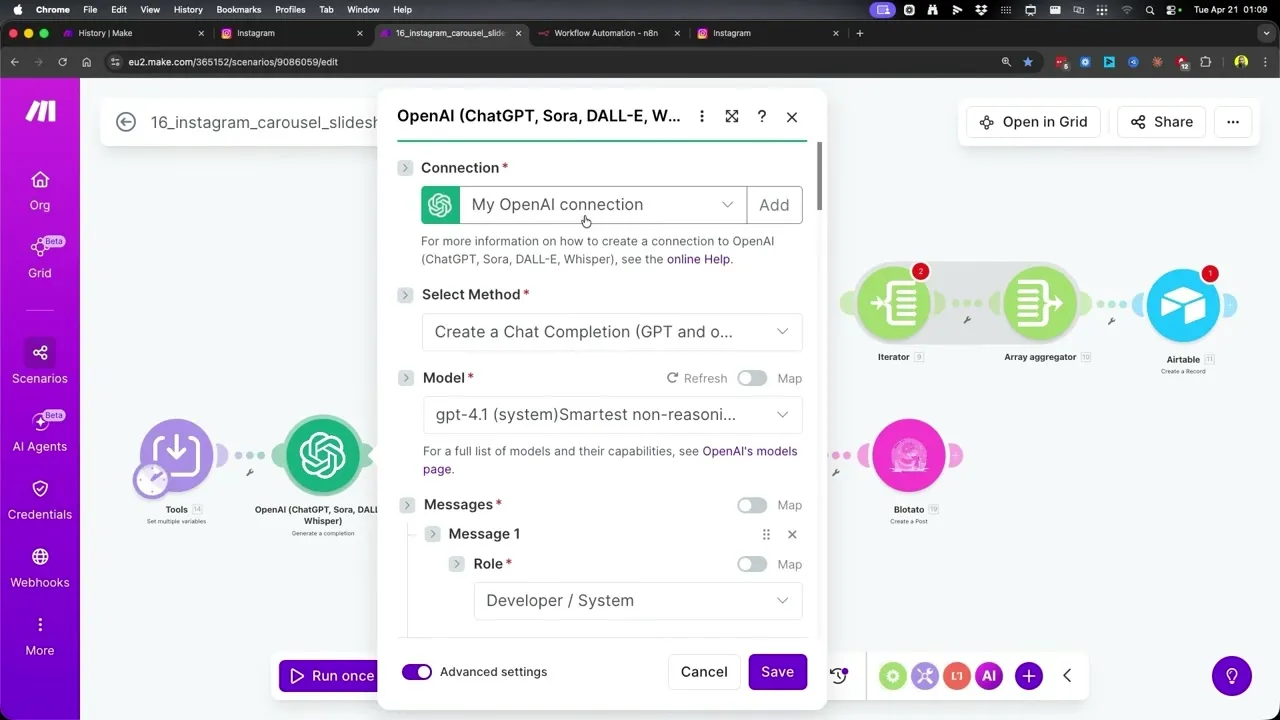
You can swap to a different model later if you want to cut costs or test a reasoning model, but gpt-4.1 is the safe default and what Kevin used for every run in the video.
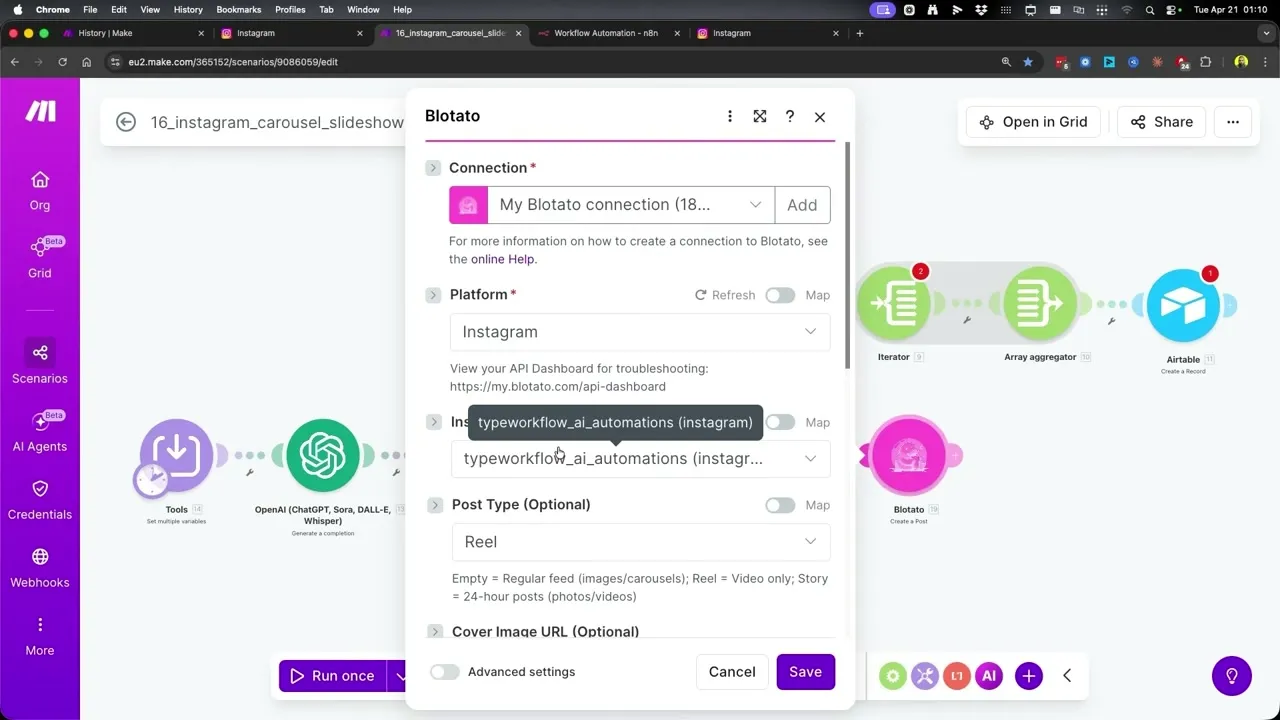
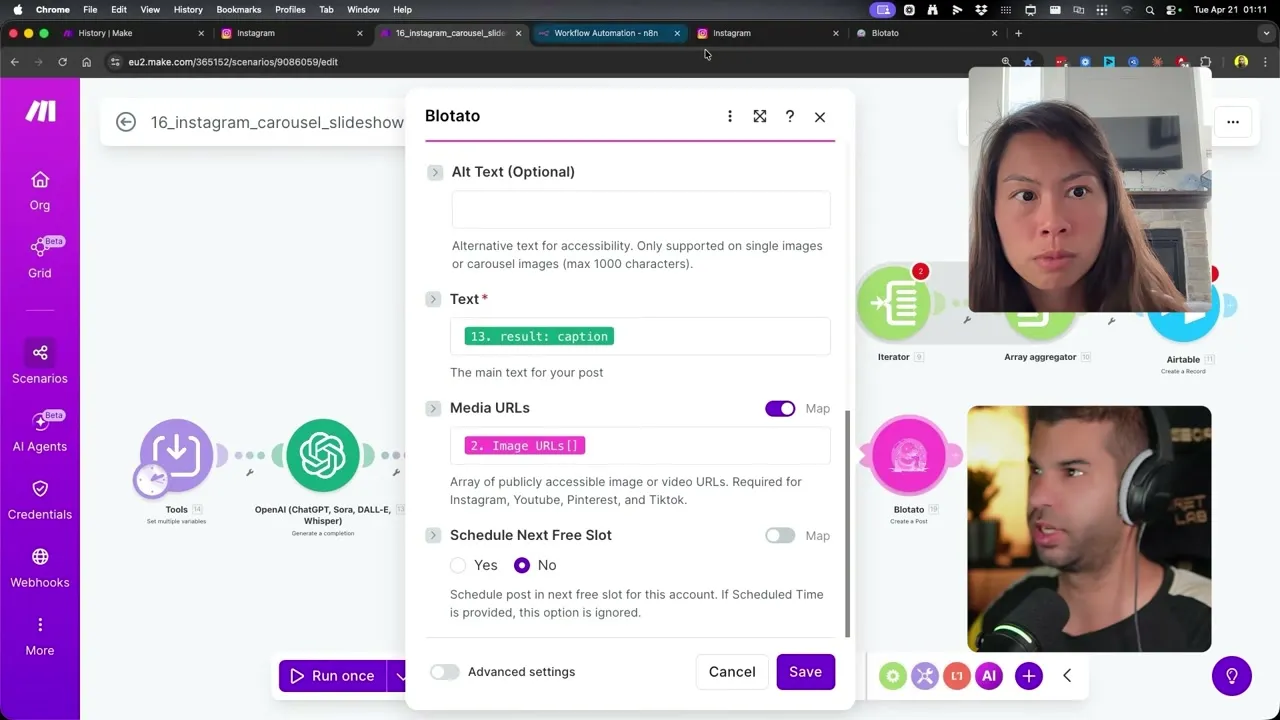
Step 4: Configure the Blotato Create Post Module
The final module in the Make.com scenario is Blotato Create Post. Pick your Blotato connection, set Platform to Instagram, and select the Instagram account you connected (Kevin’s demo runs against an account called typeworkflow_ai_automations).
To connect Instagram to Blotato in the first place, open my.blotato.com/settings, click Login with Instagram, and follow the auth flow. Once it’s connected, the same account shows up as a dropdown option in every Blotato module you use.
Step 5: Optionally Auto-Schedule to Your Next Free Slot
Inside the Blotato Create Post module there’s a toggle called Schedule Next Free Slot. If you flip it to Yes, Blotato looks at your weekly posting schedule (set inside Blotato under Calendar then Weekly Schedule) and drops the new carousel into your next open time slot automatically.
This is the workflow most creators want. You batch-generate carousels in one sitting, hit run, and Blotato spreads them across the week per the schedule you defined once. No manually picking dates or times.
Step 6: Rebuild the Same Workflow in n8n
If you prefer n8n, the same logic ports cleanly with one improvement: the polling pattern. In Make.com the scenario uses a hardcoded 5-minute wait and hopes Blotato finishes in time. In n8n you build a proper wait loop with an If node.
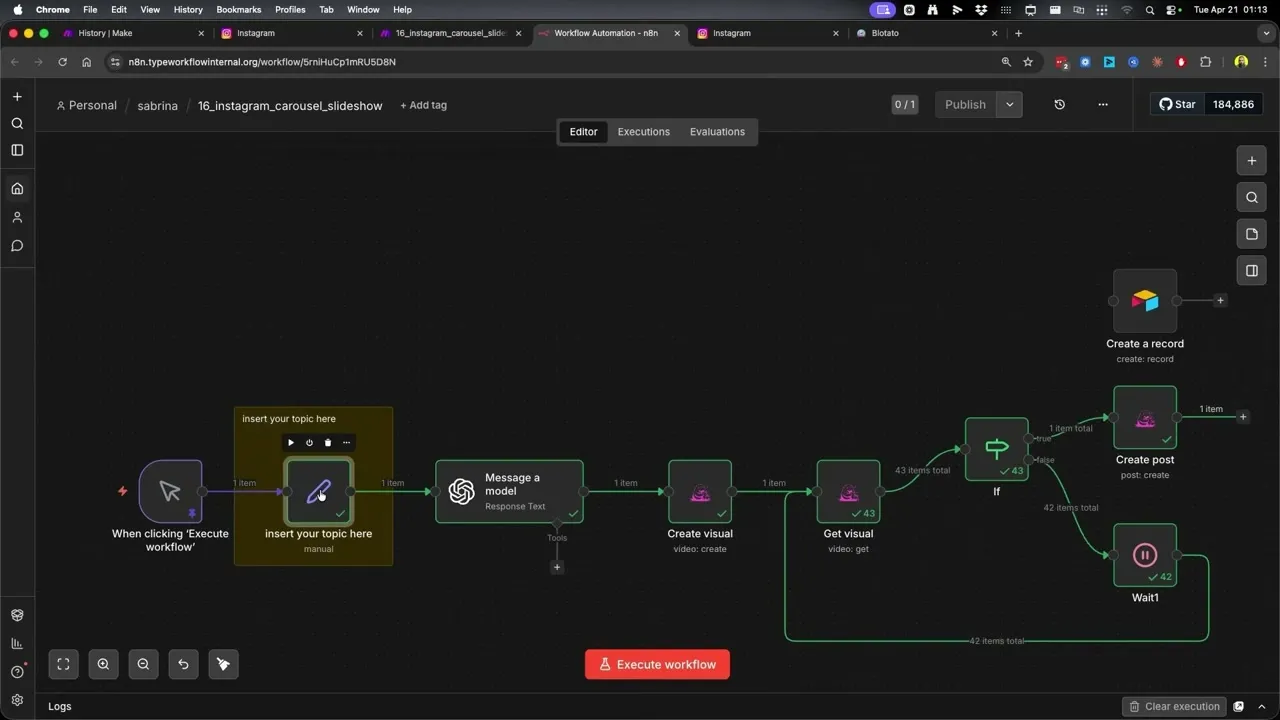
The loop starts after Create Visual. The Get Visual node checks whether the carousel is ready. If yes, the flow moves on to Create Post. If no, a Wait node holds for a few seconds and loops back. The flow keeps polling until the asset is done, then continues. This typically resolves faster than Make.com’s hardcoded wait, and it matters even more for longer assets like AI videos, where generation can take several minutes.
Step 7: Set the Topic in n8n and Run
The n8n workflow uses an insert your topic here node at the top. Double-click it, drop in your topic, and click the manual run trigger. The same OpenAI system prompt and Blotato modules do the rest.
For the demo, Kevin used “a luxury agent showing a $20 million penthouse to a mystery buyer” and the workflow returned a finished multi-slide carousel ready to publish.
Step 8: Swap In Airtable for Human-in-the-Loop Review
By default both workflows post directly to Instagram. If you want to review each carousel before it ships, disconnect the Create Post node, connect a Create Record node to Airtable, and point it at the table that ships with the template.
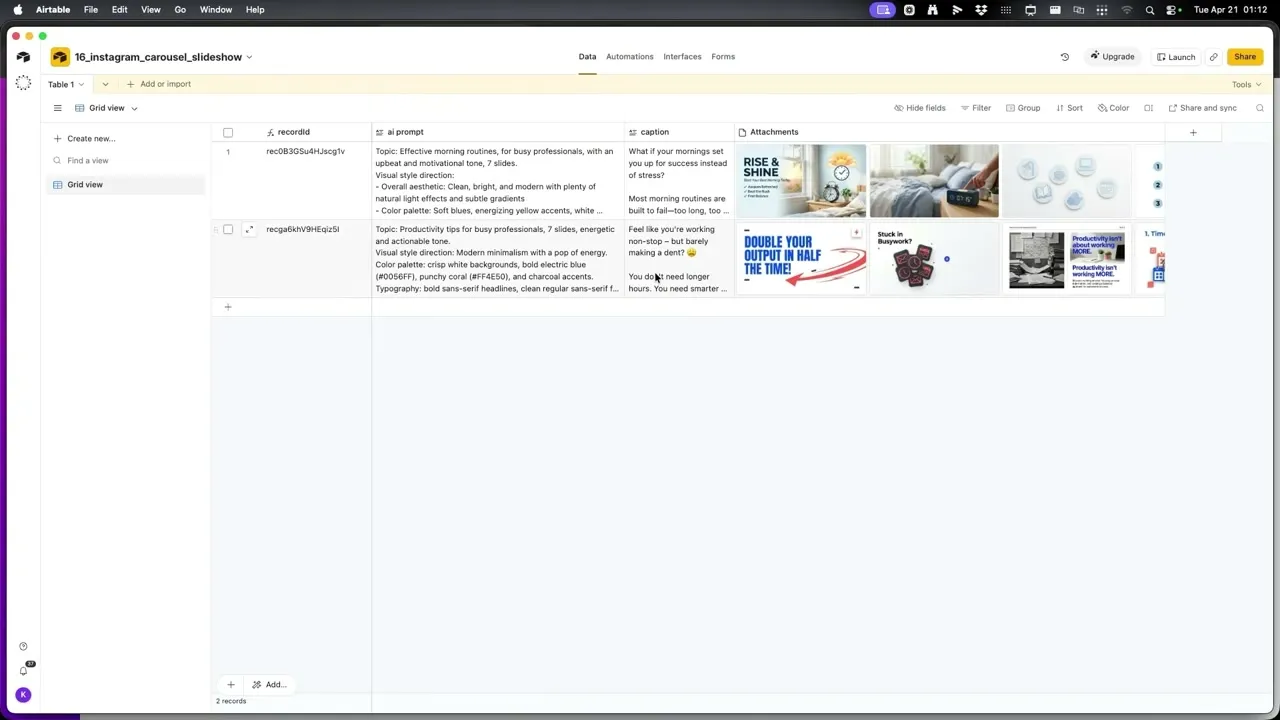
The Airtable schema saves three things per carousel: the AI prompt that generated it, the caption, and all the slide images as attachments on one row. Open a row, skim the slides, and decide whether to post it. You can set up the workflow to generate a few carousels a day, eyeball them for five minutes, and only post the strongest one.
Pro Tips From the Build
Don’t over-engineer the topic. Kevin’s specific advice: give the workflow a clear one-liner and let the system prompt do the structuring. “A listing agent selling a luxury waterfront home” beats a paragraph of context for a first run.
Cap hashtags at three in the system prompt. Kevin hit a gotcha where the default prompt was returning more than five hashtags and the Instagram post would error out. Both Instagram and TikTok now cap you at five hashtags per post, so capping at three in the prompt is the safest fix. You can push it to five once you confirm it’s working.
Don’t change the OpenAI output schema. The system prompt outputs carousel_prompt and caption as strict JSON. The downstream Blotato modules expect those exact field names. Edit the persona, audience, or tone in the system prompt freely, but leave the output schema alone.
What This Workflow Can’t Do (Yet)
This build generates and posts carousels, but a few limits are worth naming up front. The Blotato carousel module is prompt-and-template driven, so it doesn’t replace heavily custom designs with multiple image layers and bespoke type treatments. If your brand needs custom illustrations on every slide, you’ll still want a designer.
AI image generators occasionally render text with typos, especially on slides with longer headlines. The Airtable human-in-the-loop swap exists for exactly this reason. If you’re posting to a business account where typos hurt, keep that step in.
Also, the workflow assumes the OpenAI output schema stays intact. If you edit the system prompt and break the JSON contract (renaming carousel_prompt, dropping caption, or adding wrapping markdown), the downstream Blotato modules error out. Test one full run after every prompt change.
Results You Can Expect
A first-time setup takes about 20 minutes if you already have Blotato, OpenAI, and Airtable connected. After that, generating a new carousel is one variable change and one click. The Make.com run finishes in roughly 5 to 6 minutes because of the hardcoded sleep. The n8n version usually finishes in 2 to 3 minutes because the wait loop exits as soon as Blotato signals the carousel is ready.
For agencies running multiple client accounts, the per-carousel marginal cost in OpenAI tokens plus Blotato credits sits well below what a designer charges for a single set of slides. Every Blotato plan listed on the pricing page covers the carousel module and the Create Post API used in this flow.
Sabrina’s Final Take
If you post carousels even once a week, this stack pays for itself fast, especially if you run multiple accounts or want to batch a week of content in one sitting. Start with one topic, prove the workflow generates something worth shipping, then leave it in place and just swap the topic each time you run it. The biggest unlock isn’t speed, it’s that you stop avoiding carousels because the design step felt like a chore.
Automate Instagram Carousels FAQs
Can you actually automate Instagram carousels end to end?
Yes. The combination of OpenAI for slide copy and caption, Blotato’s Create Visual module for the multi-slide design, and Make.com or n8n as the orchestrator gets you from one topic input to a published Instagram carousel without any manual design work. The only optional manual step is the Airtable human-in-the-loop review.
What’s the best OpenAI model for Instagram carousel slides?
The default in the template is gpt-4.1, the strongest non-reasoning model OpenAI ships. It’s fast, cheap enough for daily use, and produces clean JSON. You can experiment with reasoning models or smaller models later, but start with gpt-4.1 until you have a clean baseline run.
Do I need n8n or Make.com to run this?
Either works. Make.com has a slightly cleaner visual canvas and is easier for first-time automation builders. n8n is more flexible and runs proper wait loops, which matters for longer AI generations. Pick the one you already pay for. The video shows both templates so you can compare side by side.
Why is my carousel posting with too many hashtags and erroring out?
The default OpenAI system prompt sometimes returns more than five hashtags, and Instagram now caps posts at five. Edit the system prompt to say “no more than three hashtags” and the issue goes away. Kevin hit this exact bug during testing and that’s the fix he landed on.
Why use Blotato instead of going straight to the Instagram API?
The Instagram Graph API requires app review for publishing and rate-limits hard on small accounts. Building it yourself takes weeks. Blotato handles the API plumbing, the rate limits, and the multi-platform posting layer, so the same workflow can also push to TikTok, Pinterest, Facebook, or LinkedIn with one node change. For the full breakdown of what the Instagram Graph API actually costs in time and access, see the Instagram API pricing guide.