How to Automate Instagram Stories With AI (Make & n8n)
How I automate Instagram Stories with AI using Make.com or n8n, Airtable approval, and Blotato. The exact workflow I ran for 10 days straight.
If you want to automate Instagram Stories without spending an hour a day inside the app, this is the workflow I actually run on my own account. I posted Stories every single day for ten days using this exact setup and it drove the biggest revenue month I’ve had for my own product. Most “schedule your Stories” guides just walk you through Meta Business Suite and stop there. This one shows you how to generate Stories with AI, queue them in Airtable, approve the best variation, and publish on autopilot.
Below are two builds, one in Make.com and one in n8n, both basic and advanced versions. Pick the path that matches the tool you already use.
How to Automate Instagram Stories (Video Guide)
If you’d rather watch the full walkthrough, this is the video version with Kevin from AnyAutomation. The written guide below covers the same two builds with extra detail on the gotchas.
Why Most Creators Still Post Instagram Stories Manually
Native scheduling for Stories has been clunky forever. Meta Business Suite lets you schedule a single image or video, but it strips out interactive stickers, link stickers, music, and polls. Almost everything that makes Stories actually convert gets stripped at the API layer. So most creators give up and post live, every day, by hand.
The problem is consistency. Stories are the warmest surface on Instagram. The people watching them already follow you, already like your content, and only see them because they tapped your profile picture. When I started posting daily Stories with a clear DM call to action, my inbox filled up with people asking for the lead magnet I mentioned. Same audience as my feed posts, far better conversion.
Automation doesn’t replace the strategy. It removes the daily-effort tax so you can actually show up consistently. That’s the entire point of this build.
How to Automate Instagram Stories: The Stack
I use the same three tools across both Make.com and n8n versions:
- AI image generation through Replicate, running either Flux 1.1 Pro or Nano Banana 2 (Google’s image model). Nano Banana 2 nails text-on-image far better, which matters for Stories with overlay copy.
- Airtable as the approval queue (advanced version only). Each AI-generated Story image lands in a row with status “To Review” so you can pick the best variation before it ships.
- Blotato as the publisher. Blotato handles the Instagram Graph API plumbing for Stories so the automation can actually post, instead of getting stuck on Meta’s permission requirements.
I’m involved with Blotato as a creator and tester, so take this with whatever grain of salt feels right. I use Blotato in this stack because the Instagram Stories endpoint is one of the most permission-gated parts of the Graph API, and most DIY API builds break at exactly that step.
Native Scheduler vs AI Workflow: Pick the Right Tool
Before you spin up an automation, decide whether you actually need one. If you only post one Story a day and you’re happy designing each one in Canva, a native scheduler is fine. If you want Stories generating themselves, the AI workflow earns its keep fast.
| Tool | What it does | What it can’t do | Best for |
|---|---|---|---|
| Meta Business Suite (free) | Schedules pre-made image/video Stories | No stickers, no link stickers, no auto-generation | Creators with under 5 Stories per week and no design budget |
| Buffer / Later / Metricool | Adds analytics + content calendar to scheduling | Doesn’t generate the image, no AI text overlay | Solo brands managing 1-3 accounts who already design Stories elsewhere |
| Make.com or n8n + AI image + Blotato | Generates the Story with AI and publishes end-to-end | Can’t post link stickers, music, or interactive polls (API limit) | Creators or agencies running 5+ accounts who want daily Stories without the daily work |
The AI workflow wins on volume and zero-touch consistency. The native schedulers win if every Story needs link stickers or polls.
Step 1: Decide Between the Basic and Advanced Build
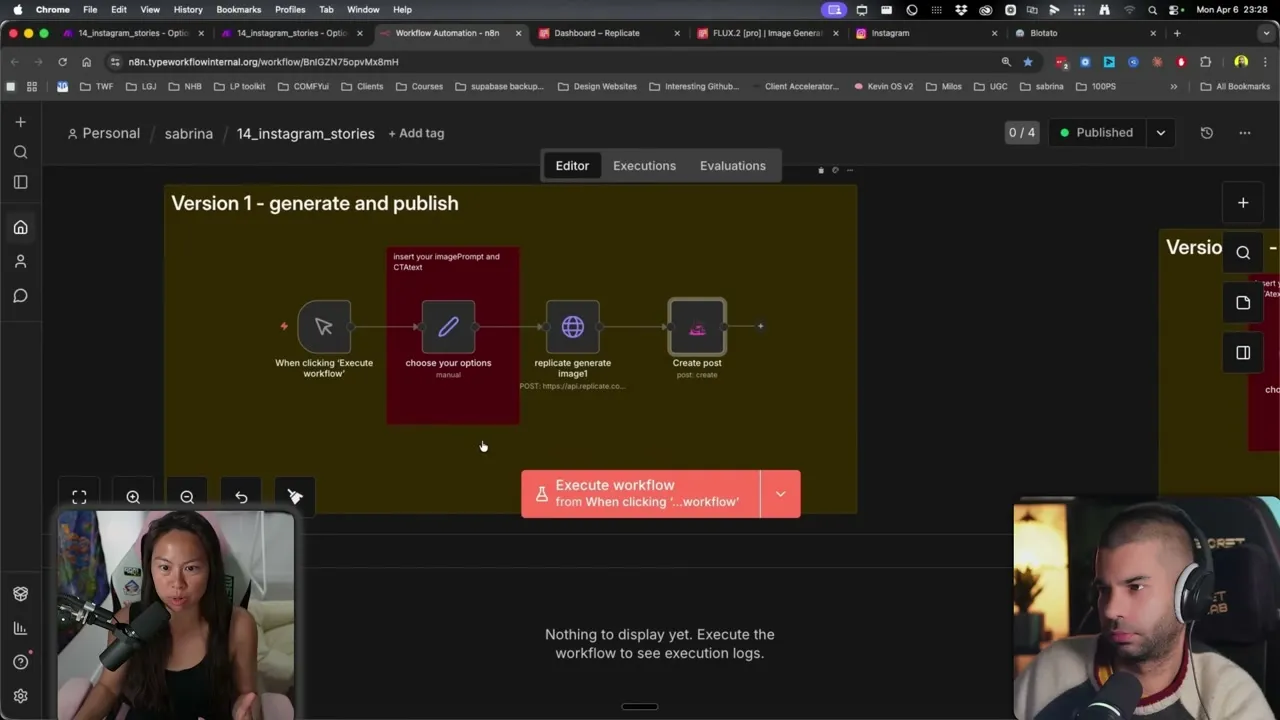
The basic version is three modules. You write a prompt, the AI generates one image, Blotato posts it as a Story. Zero review. Zero second chance to catch a typo before it ships.
The advanced version adds an AI prompt-writer that creates three image variations, generates all three, drops them in Airtable, and waits for you to mark one Approved before publishing. If you’ve ever shipped an AI-generated image with garbled text straight to your audience, you’ll want this version.
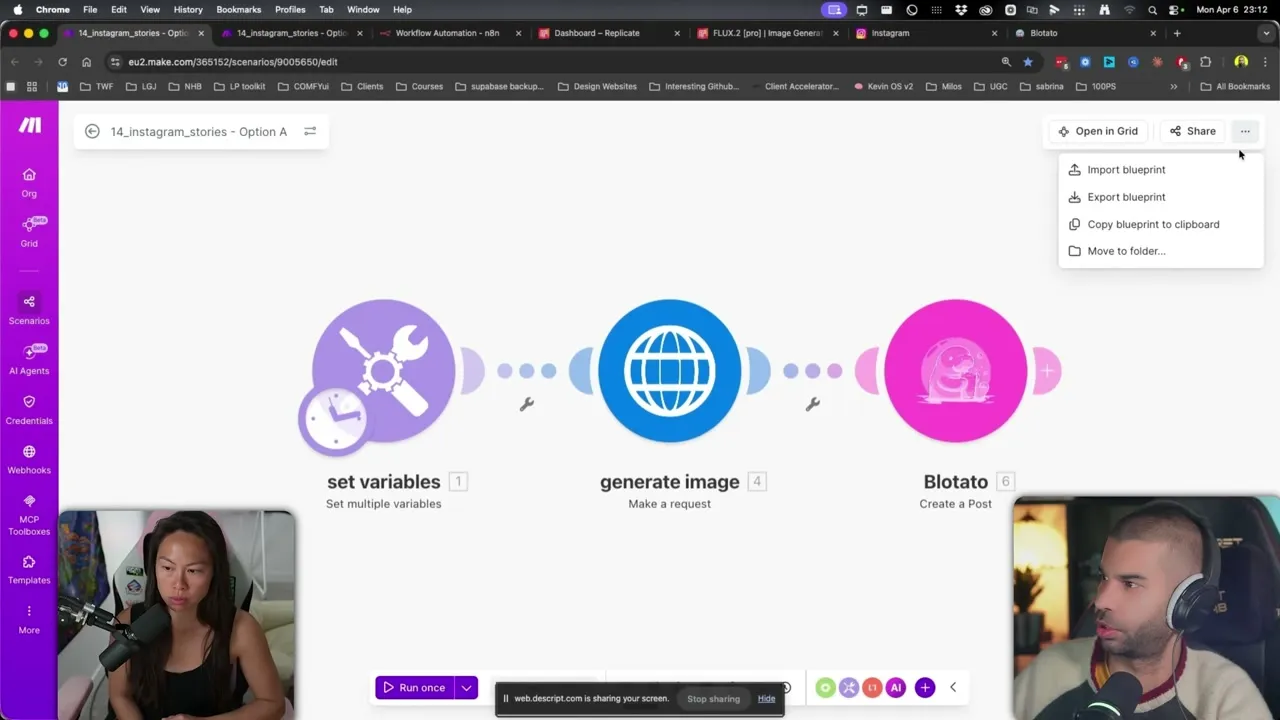
Step 2: Set Up the Basic Make.com Workflow
Import the blueprint into Make.com from the three-dot menu. There are only two fields you need to edit. The first is the image prompt, which describes what you want in the visual. The second is the call to action overlaid on the image.
For the demo I used: “A lady sharing her online recipes at the center of the image. At the top, there’s a text saying…” with a CTA of “If you’re struggling with weight loss, DM me ‘guide’ to get my free report.” Swap in whatever fits your niche. Real estate, fitness, ecommerce, agency, the structure doesn’t change.
The image generation node calls Replicate. The default model is Flux 1.1 Pro, but you can swap to Nano Banana 2 by changing the model identifier and pasting your Replicate API key. Nano Banana 2 produces dramatically fewer typos in overlay text, which matters when you’re skipping the review step.
Step 3: Connect Blotato to Publish to Instagram
The third module sends the finished image to Blotato, which pushes it to Instagram as a Story. Add your Blotato API key once and the connection persists. Grab the key from your Blotato dashboard under Settings → API.
The Instagram Graph API has strict permissions for Stories specifically, and getting a custom Meta app approved for Stories publishing is a slow process most solo creators give up on. Blotato handles the API plumbing and Instagram-side rate limits, which is why every workflow in this post hands the publish step to Blotato instead of building it raw. If you want to see how this fits into a bigger content engine, check out how to automate Instagram Reels, automate Instagram carousels, or my social media automation tools breakdown for the rest of my stack.
Step 4: Add the Human-in-the-Loop Layer (Advanced Make.com Build)
The advanced version starts the same way, but instead of generating one image it sends your prompt to an AI agent with this instruction: generate three creative variations of the image prompt that incorporate both inputs, each with a slightly different style, mood, or composition.
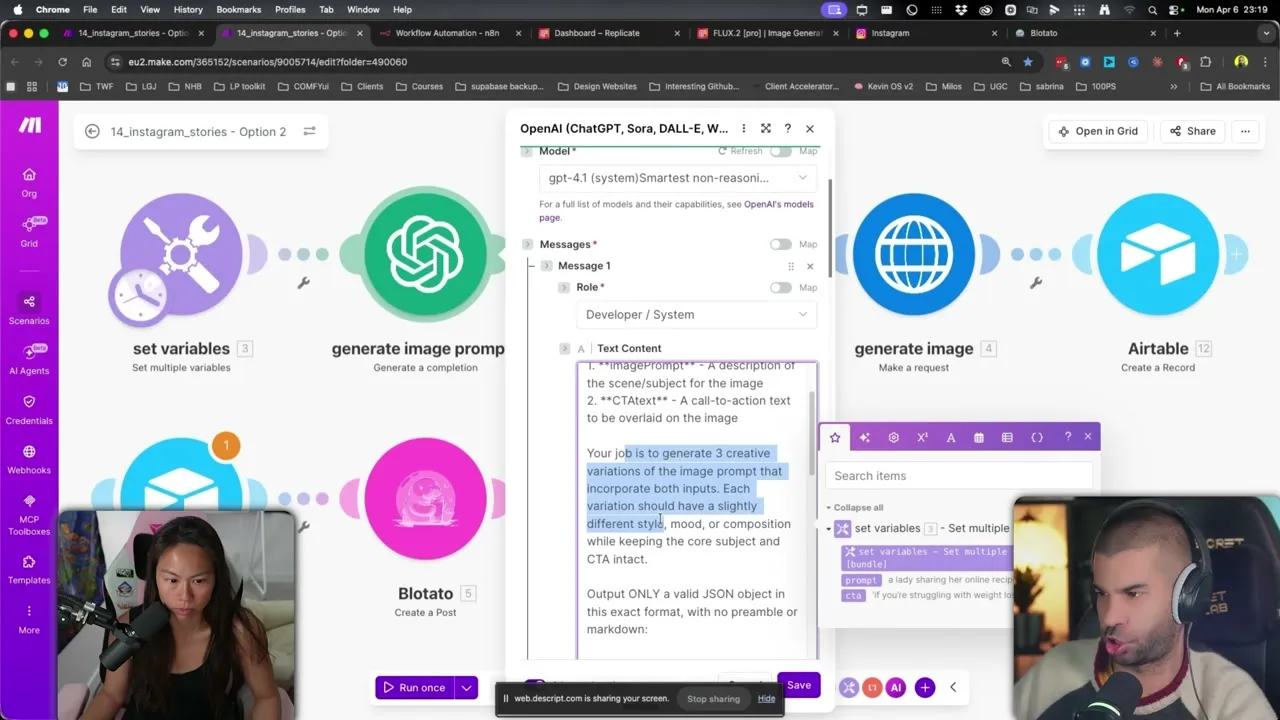
Those three prompts get passed to Replicate, which generates three images. An iterator loops through them and writes each one as a row in Airtable with a status of “To Review.” Here’s what the full advanced flow looks like end to end:
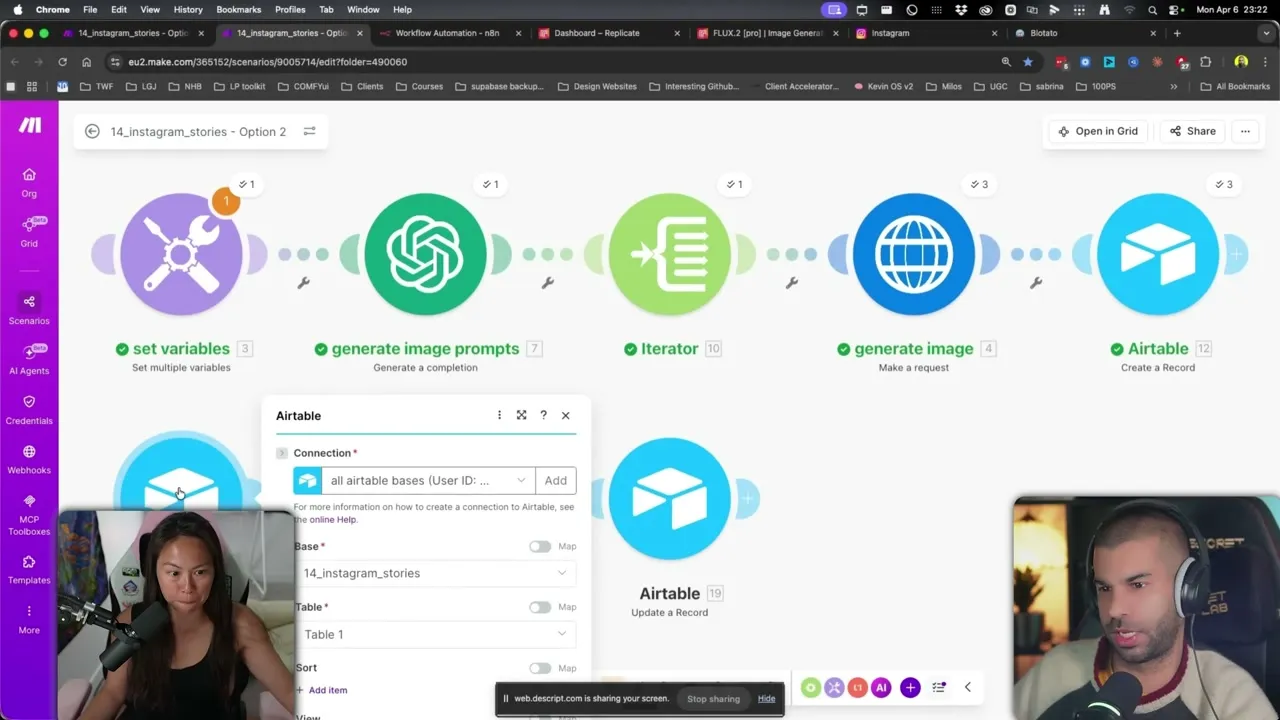
Step 5: Review and Approve in Airtable
Open Airtable, look at the three image options side by side, and pick the one that’s typo-free and on-brand. Change its status from “To Review” to “Approved.”
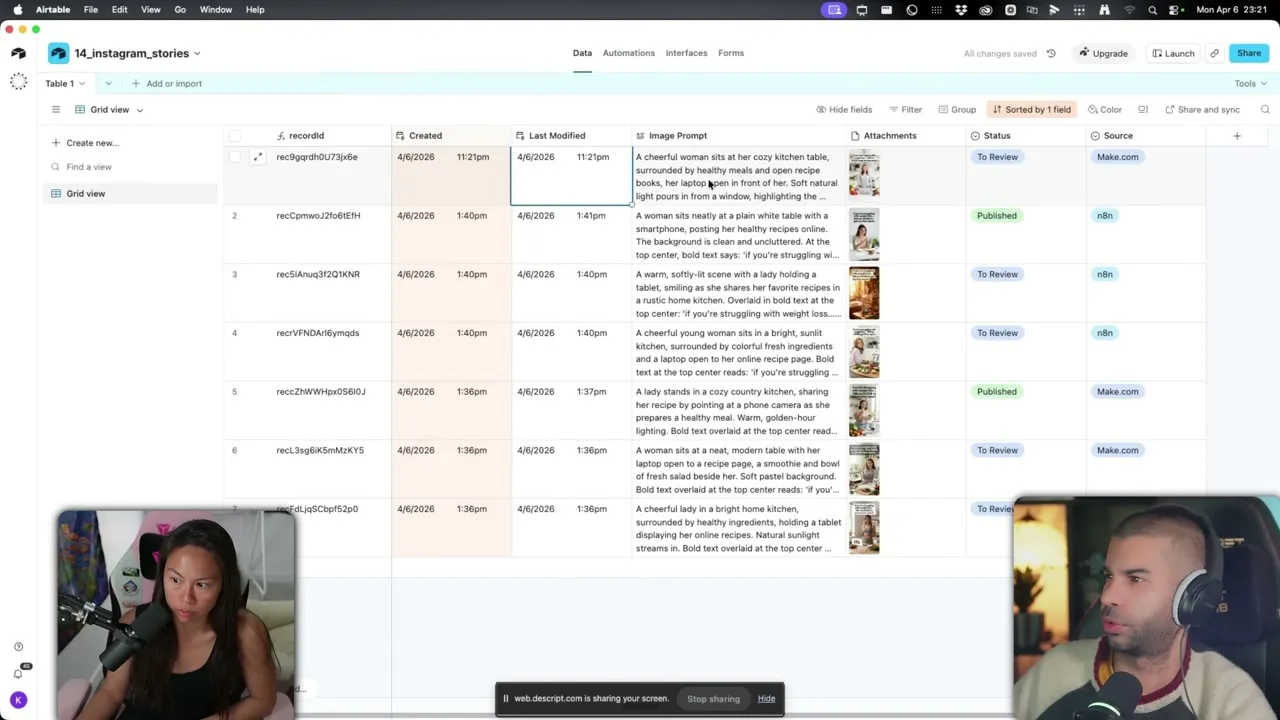
That status change is the trigger for the second half of the automation. A separate Make.com scenario watches the Airtable for “Approved” rows, sends the image to Blotato, posts it to Instagram, and updates the status to “Published” so the same image never goes out twice.
One Make.com gotcha worth flagging: you can’t have two trigger entry points in a single scenario. The advanced version is two separate blueprints, both included in the template.
Step 6: Build the Same Workflow in n8n
n8n is the better fit if you want both flows in one workflow. Unlike Make.com, n8n lets you have multiple triggers on the same canvas, so the basic version, the variation generator, and the publish-after-approval flow all live in a single view.
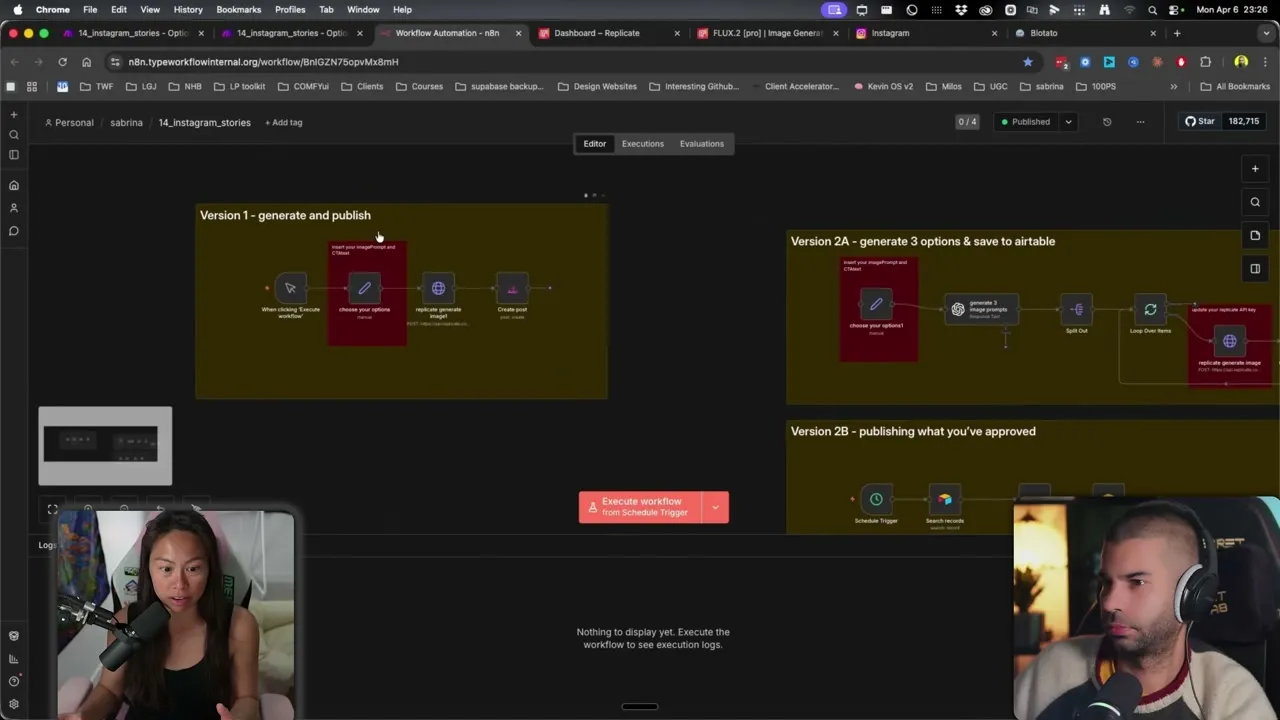
The basic n8n version is just four nodes: a manual or scheduled trigger, a Choose Your Options node where you write the prompt and CTA, the Replicate node to generate the image, and a Create Post node that hands off to Blotato.
For the advanced n8n flow, the OpenAI node generates three variations, a Loop Over Items node sends each to Replicate, and the publish flow watches for “Approved” status in Airtable. Same logic as Make.com, just easier to manage in one canvas.
If you’re already running n8n for other Instagram automations, see how Blotato’s social media API plugs in directly so you can skip the Meta developer app dance.
Step 7: Schedule It and Walk Away
In Make.com, switch the scenario on and set the timer. The default runs every 15 minutes, which is too aggressive for Stories. Change it to once per day at the time your audience is most active, or pick specific days of the week.
If you’re new to Stories, post three to four times per week to start. Daily can work, but only if you have enough lead magnets and angles to rotate through. One day promote a comment-to-DM guide, the next a checklist, the next a case study. The variety is what keeps Stories from feeling like a single repeating ad.
The Instagram Stories endpoint is the part of this build that breaks most often when people try to wire it up themselves, which is why every workflow above hands the publish step to Blotato. If you want to test the whole stack on your own account, start a free 7-day Blotato trial, connect Instagram, and run your first AI-generated Story end to end. The trial covers the AI image credits and the Stories publishing endpoint. The API access the Make.com or n8n flow needs is a paid-plan feature: generating an API key in Settings ends the free trial and activates your paid Starter plan.
Pro Tips for Better AI Story Images
Use Nano Banana 2 if you can. Flux 1.1 Pro occasionally garbles overlay text, and the whole point of Story automation is shipping without manual cleanup. Nano Banana 2 renders text correctly far more often, which is what makes the basic unattended version safe to run.
Start with the outcome, not the visual. Before you write the image prompt, decide what you want the viewer to do. DM you a keyword? Click a link in your bio? Reply with a question? The CTA shapes the prompt, not the other way around. Build a bank of three to five different angles you can rotate through so the Stories feel fresh instead of templated.
What This Workflow Can’t Do (Yet)
Be honest with yourself about the API limits before you build:
- Link stickers aren’t supported through any third-party Stories publisher, including Blotato. If you need a tappable link sticker on a Story, post that one manually. Use the automation for the static lead-magnet Stories where you ask for a DM keyword instead.
- Music stickers and interactive polls are also blocked at the API layer.
- Story replies routed to your DMs still work normally on automated Stories. The reply experience for your audience is identical to a manually posted Story.
For most lead-gen Stories (DM keyword, comment for guide, swipe-up replacement via DM), none of this matters. For Stories that depend on link stickers or polls, keep those in your manual workflow and let the automation handle the daily repetition Stories.
Results You Can Expect
I posted Stories every single day for ten days using this exact workflow and it drove my largest revenue month ever for my own product. Most of the engagement that converted came from Story viewers, not feed viewers, because they were already warm. Your numbers will depend on your audience size and offer, but the pattern holds: consistent Story posting with a clear DM call to action outperforms sporadic feed posts almost every time.

Sabrina’s Final Take
If you’re posting Stories sporadically and your DMs are quiet, fix the consistency problem first. Start with the basic Make.com or n8n flow, ship 10-20 unattended Stories with Nano Banana 2, then add the Airtable approval layer once you have a feel for which prompts convert. If you’re running 5+ accounts, the Blotato Starter plan covers 20 of them on flat pricing, so the same automation points at every brand you manage. The whole point is letting your warmest audience hear from you every day without you opening the app.
Automate Instagram Stories FAQs
Can you actually automate Instagram Stories with AI?
Yes. With an AI image generator (Replicate running Nano Banana 2 or Flux), an automation platform (Make.com or n8n), and a publishing tool that supports the Instagram Graph API for Stories (Blotato), you can generate and publish a Story end-to-end with zero manual steps. Both workflows in this post run unattended on my own account.
What’s the best AI model for Instagram Story images?
Nano Banana 2 (Google’s latest image model) is my pick because it renders overlay text correctly more often than the alternatives. Flux 1.1 Pro on Replicate works too and is the default in the templates, but expect occasional typos. If you’re skipping the human approval step, model choice matters more, because nothing is catching errors before they ship.
Do I need n8n or Make.com to automate Instagram Stories?
You need one of them, but not both. Make.com has a friendlier visual editor and is easier to learn if you’re new to no-code automation. n8n is the better fit if you want multiple triggers in a single workflow, want to self-host, or are running other automations on it already. Both connect to Blotato natively.
How often should I post Instagram Stories?
Three to four times per week is the floor for staying top-of-mind without exhausting your audience. Daily works once you have a steady stream of CTAs and lead magnets to rotate through, but daily without variety burns out viewers fast. The whole advantage of automation is consistency, not raw volume, so set a sustainable schedule and let it run.
Why use Blotato in this workflow instead of posting to Instagram directly?
Instagram’s Graph API has strict permissions for Stories specifically, and getting a custom Meta app approved for Stories publishing is a slow, painful process. Blotato handles the API plumbing, Instagram-side rate limits, and the permission setup, so the automation only has to send an image and a caption. It’s the same reason most no-code automation tutorials use a publisher in this slot instead of building one raw.