How to Build Your Own Social Media Scheduler With Claude Code
Build your own social media scheduler with Claude Code: the calendar and rules you write, the queue an API holds, and where DIY stops.

You can build your own social media scheduler with Claude Code, as long as you build the right half. The calendar, the approval screen and your posting rules are the quick part. The half that eats months sits underneath: nine platforms, nine auth flows, and app reviews that can block you outright.
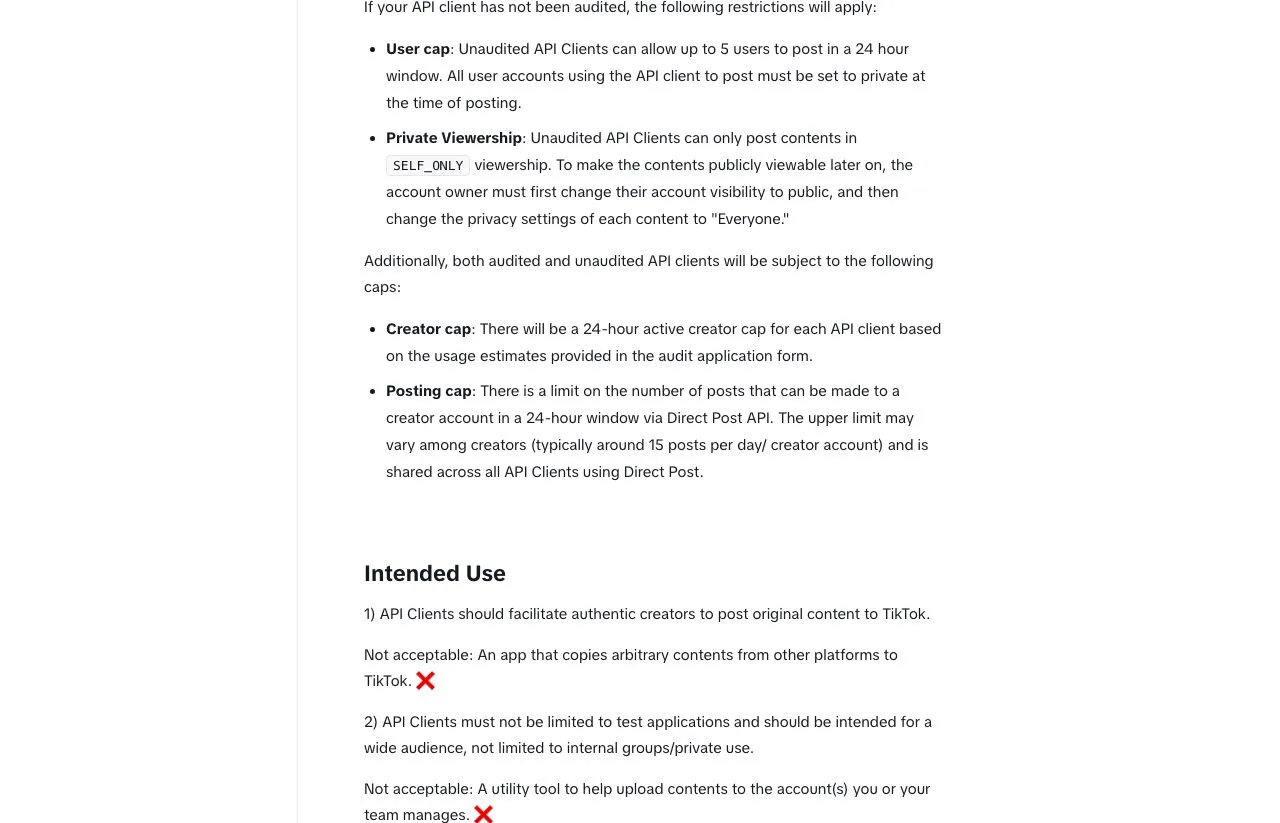
TikTok is the clearest example. Its Content Sharing Guidelines list “a utility tool to help upload contents to the account(s) you or your team manages” as not acceptable for audit. An unaudited app can only post in private mode, for up to 5 users a day. A personal scheduler is exactly the app TikTok says it will not approve.
You build the calendar with Claude Code and get the publishing layer from an API. I’ll use Blotato’s. I run Blotato, so weigh my framing accordingly, and I’d be a bad founder if I didn’t tell you where building everything yourself still makes sense.
Build Your Own Social Media Scheduler at a Glance (2026)
A social media scheduler has five layers, and only two of them are worth writing yourself.
| Layer | What it does | Build it or call it | Where DIY breaks |
|---|---|---|---|
| Calendar and approvals | Week view, drafts, who signs off on what | Build it with Claude Code | Rarely. This is the part that should be yours. |
| Posting rules | Cadence, best times, which account gets what | Build it, or store it as API slots | Timezones and daylight saving |
| Queue and clock | Holds posts and fires them on time | Call an API, or run your own worker | A missed cron run publishes nothing, silently |
| Platform publishing | OAuth, tokens, per-platform payloads | Call an API | App review, token refresh, nine payload formats |
| Status and failures | What went out, what failed, and why | Call an API | Posts that fail with no error you can see |
Write the top two rows and call an API for the bottom three. Those three work the same for every scheduler, and the platforms keep changing them under you.
If that split fits your project, here is what Blotato’s Starter plan includes.
Free 7-day trial · Cancel anytime
One thing to know before you click: the trial does not include API access. Generating an API key ends the trial and starts the paid Starter plan, so budget for the subscription rather than a free test.
Why the Platform Layer Is the Half Not to Build
The guides that rank for this topic draw the same architecture: a database of posts, a cron job that runs every minute, and a queue that calls each platform. The diagram is accurate, but the time goes somewhere it never shows: getting each platform to accept your app.
TikTok is the hard wall. Its app review guidelines add that “apps must not be for private or personal use,” so a scheduler built for your own brand fails review by design.
Instagram is gentler but fussier. Meta’s content publishing docs only support Instagram professional accounts. Publishing is a two-step process, where you create a media container and then publish it, and a container you don’t publish within 24 hours expires. The same guide gives two daily caps, 100 API-published posts per moving 24 hours in its rate-limit section and 50 in its carousel section, a split I unpack in the Instagram posting API guide.
Then multiply that by nine. Each platform has its own token lifetime, refresh flow and required fields, and each one breaks quietly when the platform changes something.
Building the whole stack yourself still makes sense in two cases: you post to one or two platforms whose developer access you already hold, or you need a platform outside Blotato’s 9. Past that, the integration layer is where your weeks go.
If you are still choosing an API, I compared eight of them on scheduling fields and billing in the best social media scheduling APIs.
What You Need Before You Start
Four things. People skip the third.
- A paid Blotato plan. Every paid plan includes the API, starting with Starter.
- Claude Code, installed and working in a fresh project folder. The Claude Code docs cover setup.
- Your social accounts connected inside Blotato first. An empty account list comes back as a successful response, which is easy to misread as a broken setup, so connect at least one before you write code.
- Your API key, generated in Blotato under Settings > API, stored in an environment variable on a server, never in the repo and never in browser code. Every request sends it in a
blotato-api-keyheader, so make the calls from a server route, or anyone who opens your app can read the key.
How to Build Your Own Social Media Scheduler With Claude Code (Step-by-Step)
The build is eight steps. Two of them, the spec and the approval queue, are entirely yours. The other six call endpoints under https://backend.blotato.com/v2.
| Step | Endpoint | What your scheduler does with it |
|---|---|---|
| 1. Spec | none | Tell Claude Code what to build and where the docs are |
| 2. Accounts | GET /users/me/accounts | Fill the account picker |
| 3. Calendar | GET /posts | Draw scheduled, published and failed posts on the week view |
| 4. Drafts and approvals | none, your own database | Hold drafts until someone signs off |
| 5. Schedule | POST /posts | Queue an approved post for a future time |
| 6. Slots | POST /schedule/slots | Save your posting cadence once |
| 7. Edit and cancel | PATCH and DELETE /schedules/:id | Drag a post to a new time, or kill it |
| 8. Status | GET /posts/:id | Show whether a post actually went out |
Step 1: Give Claude Code a spec, not a wish
Point Claude Code at Blotato’s agent-readable docs index at help.blotato.com/llms.txt so it reads the real field names instead of guessing them.
Build a small web app: a weekly social media scheduling calendar.
Stack: your choice, keep it simple. Read API docs from https://help.blotato.com/llms.txt.
Data comes from the Blotato REST API (base https://backend.blotato.com/v2,
header blotato-api-key from the BLOTATO_API_KEY env var). Call it only from server routes,
never from the browser, and put every route behind a login. Keep drafts and approvals in a small local database.
Only approved posts go to Blotato. Scheduled and published state lives in Blotato.
Views: a week grid with drafts, scheduled, published and failed posts. A composer that
picks an account, writes text, adds media URLs and picks a time or "next free slot."
Store all times in UTC. Show them in my timezone, America/Chicago.
Build it in stages. Start with read-only: list accounts and draw the week.
A read-only calendar first means nothing can publish by accident while you test the layout.
Step 2: Load the accounts
GET /users/me/accounts returns every connected account and its ID. Facebook and LinkedIn company Pages need a second call, GET /users/me/accounts/:accountId/subaccounts, to get the pageId a post requires. Pinterest boards come from GET /social/pinterest/boards. Your composer should never ask a human to type an ID.
Step 3: Draw the calendar from what’s already queued
GET /posts is your week view. It returns scheduled, published and failed posts in one list, filtered by since, until, status and platform, up to 250 per page with a cursor for the rest. Without since and until it covers 7 days back to 7 days ahead.
Each item’s id means something different depending on its state: a scheduled item carries its schedule ID, and a published item carries the published post ID. Keep them in separate fields, because Step 7 needs the schedule ID.
Step 4: Build the drafts and approval queue
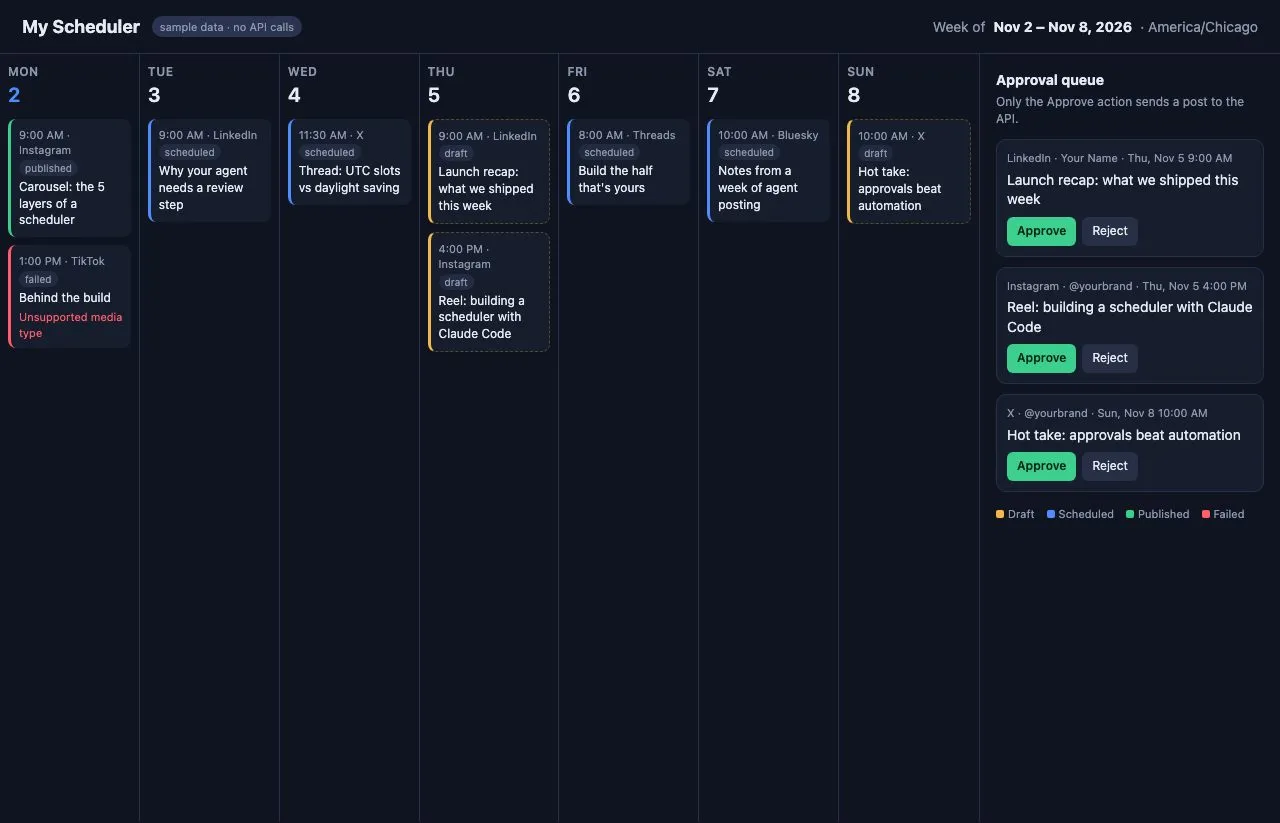
This is the part of the scheduler that is actually yours, and it is the reason to build one at all. Blotato’s create call publishes or schedules the moment it lands, with no approval step in between. So the approval gate has to live in your app, before anything touches the API.
Give Claude Code a small table for it: the account, the text, the media URLs, the requested time, a status of draft, approved or rejected, who approved it, and an empty field for the postSubmissionId. Your week view shows drafts next to the posts that GET /posts returns.
The approve action is the only code path that calls POST /posts. It refuses anything whose status isn’t draft, so a double click can’t send a post twice, and it saves the returned postSubmissionId for Step 8. No documented field links that ID to the schedule ID Step 7 needs, so find the queued item in GET /posts by account and the resolved scheduledTime, store its id on the draft, and hide the draft card so the post doesn’t show twice.
Everything about the workflow is yours to shape: one approver or two, a rule that LinkedIn posts need two approvers and X posts need one, a comment thread on each draft.
Here is what that looks like in a prototype built with Claude Code from the Step 1 spec, running on sample posts. Drafts sit in the week view with dashed borders until someone approves them.
Step 5: Schedule an approved post
When a draft is approved, your app sends this request. The scheduling field sits at the top level of the body, next to post, never inside it:
curl -X POST https://backend.blotato.com/v2/posts \
  -H "blotato-api-key: $BLOTATO_API_KEY" \
  -H "Content-Type: application/json" \
  -d '{
    "post": {
      "accountId": "YOUR_ACCOUNT_ID",
      "content": {
        "text": "Scheduled from my own calendar.",
        "mediaUrls": [],
        "platform": "linkedin"
      },
      "target": { "targetType": "linkedin" }
    },
    "scheduledTime": "2026-11-09T15:00:00Z"
  }'
Get the nesting wrong and you get the worst bug a scheduler can have. Blotato’s publishing reference says scheduling fields nested inside post “are ignored and the post publishes immediately.” Put a test in your app that fails if scheduledTime ever lands inside post.
Three more things about this call. There is no separate timezone field, so the timestamp’s own offset is the only zone information Blotato gets, and it returns times in UTC, so send UTC with a Z.
You can schedule up to 9 months ahead on every plan. And the response gives you a postSubmissionId plus the resolved scheduledTime, which is a receipt, not proof the post went live.
Step 6: Add posting slots so you stop picking times
Slots are your cadence, saved once: “Monday 9:00 for LinkedIn, Wednesday 13:00 for X.” You create them with POST /schedule/slots, each with a day, hour, minute and selectedTargets, the accounts it applies to. Then any post can send "useNextFreeSlot": true instead of a time, and Blotato drops it into the next open slot for that account.
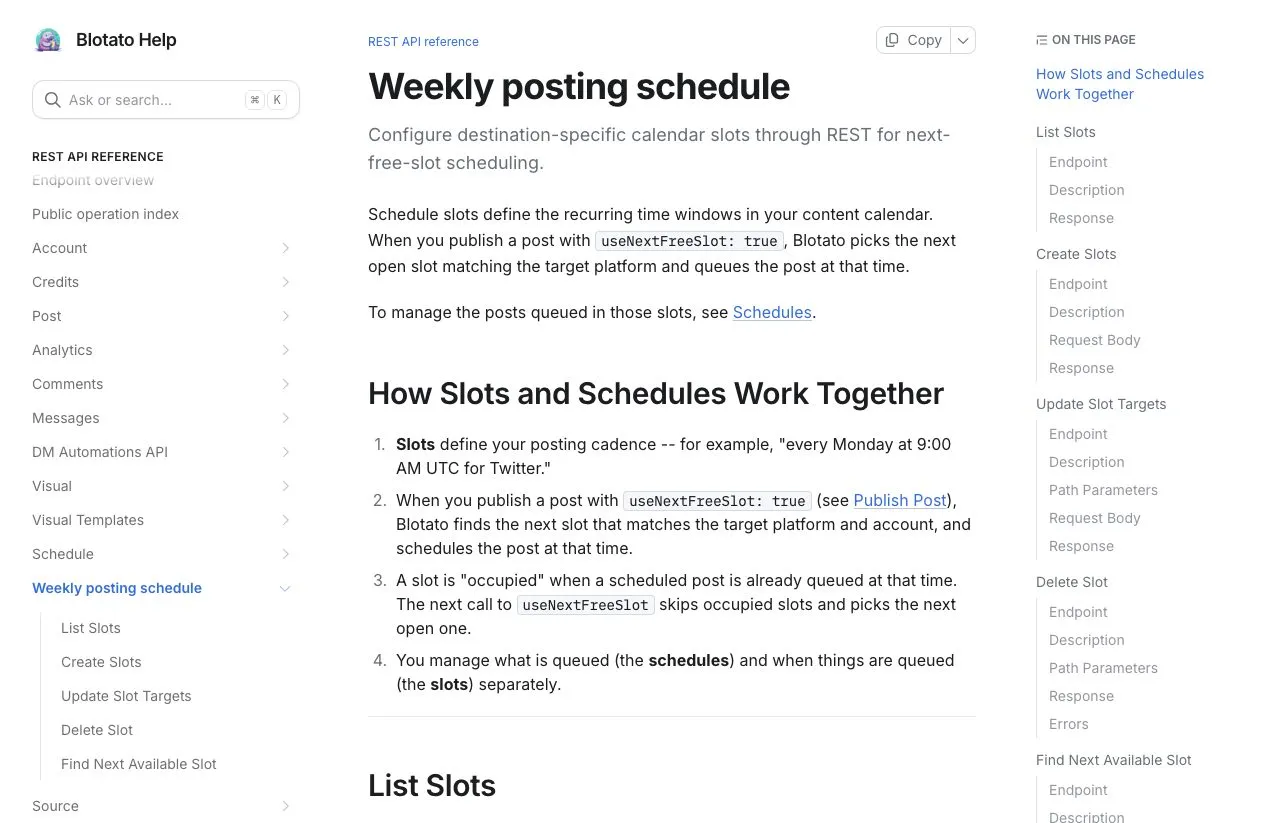
Slots are stored in UTC, and Blotato’s scheduling docs warn that “a fixed UTC slot does not promise a fixed local hour” across daylight saving, so a slot set for 9:00 local drifts to 8:00 or 10:00 when the clocks change. A slot’s accounts can be edited but its time can’t, so show the local time in your UI and offer to create a replacement slot. The old one can’t be deleted while future posts still use it, so with the user’s OK, reschedule those posts first, since a new time clears their slot link.
If no slot matches, the create call returns a validation error. Show it to the user. Retrying without the scheduling fields would publish the post on the spot.
Step 7: Make edits and cancels safe
Drag-and-drop rescheduling is a PATCH /schedules/:id. Watch the nesting, because it flips from Step 5: here scheduledTime goes inside a patch object, not at the top level. Editing the text is the same call with a draft inside patch, and the rule is strict: the draft must be the complete post object. The endpoint does not merge partial edits, so read the schedule first, change only what the user changed, and send the whole thing back.
If a text edit needs sign-off again, hold the new text as a draft in your app and send the PATCH only after approval. Until then the original version stays queued and publishes on time.
The update call also does not accept useNextFreeSlot. To move a post to the next open slot, ask POST /schedule/slots/next-available for the time first, then send that time in the PATCH.
Never “edit” by creating a new post and deleting the old one. If the delete fails, you publish twice. DELETE /schedules/:id cancels the queued job, and it does not touch posts that are already live.
Both calls return 204 with no body, so re-read the schedule after an update and refresh the week view after a cancel.
Step 8: Show what actually went out
Poll GET /posts/:id with the postSubmissionId your approve action saved, at least 10 seconds apart and with a cap on attempts. You’ll see in-progress, scheduled, published with a publicUrl when one is available, or failed with an errorMessage. Poll only the ID you saved: an ID Blotato doesn’t recognize also comes back in-progress, so a typo looks like a post that is still processing.
A scheduled post reports scheduled, so stop polling once you see it, or your app will wait forever for a post that is not due yet. Check again after its time if you want the live link on the calendar. When a post fails, show its errorMessage on the calendar card, and look it up in this breakdown of real failed-post errors for common causes and fixes.
The prompt lines that keep Claude Code on track
Seven prompt lines, one for each of Steps 2 to 8, head off the most common mistake at each.
| Step | Put this in your prompt | The mistake it prevents |
|---|---|---|
| Accounts | ”Load account, Page and board IDs from the API. Never hard-code an ID.” | A post sent to the wrong account, or a missing pageId |
| Calendar | ”Keep schedule IDs and published post IDs in separate fields.” | Sending a published post’s ID to the schedule endpoints |
| Approvals | ”Only the approve action may call POST /posts, once per draft.” | A draft going live because the create call has no approval step |
| Schedule | ”scheduledTime is a top-level sibling of post, in UTC. Add a test that fails if it is nested.” | A scheduled post publishing immediately |
| Slots | ”Show slot times in my local time and flag daylight saving shifts.” | A 9:00 slot quietly moving to 8:00 |
| Edit | ”PATCH sends the complete draft inside patch. Never create and delete to edit.” | Wiped fields, or the same post going out twice |
| Status | ”Poll only the saved postSubmissionId, 10 seconds apart, with an attempt cap. Stop at scheduled.” | A status loop that never ends |
The Limits Your Scheduler Inherits
Nine limits come with the publishing layer, and each one belongs in your UI before a user runs into it.
| Limit | Value | Where to show it |
|---|---|---|
| Scheduling horizon | 9 months ahead, every plan | Cap the date picker |
| Queued scheduled posts | 200 on Starter, 1,000 on Creator, 3,000 on Agency | A queue counter |
| Create-post rate | 30 requests per minute | Throttle bulk imports |
| 50 posts per account per 24 hours | Per-account daily counter | |
| 25 posts per Page per 24 hours | Per-Page daily counter | |
| 50 posts per profile and per company Page per 24 hours | Per-account daily counter | |
| YouTube | 10 uploads per channel per 24 hours on Starter, 25 on Creator and Agency | Composer warning |
| TikTok | 3 posting destinations per rolling 24 hours on Starter, and 25 posts per account per 24 hours on every plan (Starter’s error message still says 10) | Composer warning |
| 10, 20 or 50 posts per 24 hours, set by the account’s monthly views | Composer warning |
The per-platform caps are Blotato’s own, set tighter where spam risk runs higher, and each platform’s own rate limits still apply on top.
If your plan is to post 80 times a day to one Instagram account, this setup is the wrong fit. Blotato’s social accounts docs list the current numbers per platform.
Skip the Calendar Entirely? Let Claude Be the Scheduler
If you don’t need a UI at all, the MCP server lets Claude do the scheduling from a chat. Add it to Claude Code with one line, then sign in with OAuth or your API key:
claude mcp add --transport http blotato https://mcp.blotato.com/mcpThe Blotato MCP server exposes 35 tools, per its tools reference and the live server in November 2026, and nine of them cover the scheduling side of this guide: blotato_list_accounts, blotato_create_post (which takes scheduledTime or useNextFreeSlot), blotato_list_schedules, blotato_get_schedule, blotato_update_schedule, blotato_delete_schedule, blotato_list_posts, blotato_get_post_status and blotato_create_presigned_upload_url for local media. The one piece they leave out is creating slots, so set those up once through REST or the Blotato calendar.
I walk through running social this way, with no app at all, in how I automate my social media with Claude Code.
What This Setup Is, and What It Isn’t
What you have built runs on one Blotato workspace with one login. Blotato supports one user per account, with no separate teammate logins, roles or audit trail. The accounts it posts to are the ones you connect, up to 20, 40 or 100 depending on the plan.
What it is not is a product where your customers sign up and connect their own social accounts. Your app can have its own logins and approval screens, but every post goes out through the accounts you connected.
The Honest Pitch: Build the Calendar, Rent the Plumbing
One API. Nine social platforms.
Blotato covers the bottom three layers of that first table for 9 platforms behind one key. Starter is $29 a month for 20 accounts, and the price does not change with how many posts your scheduler sends, inside the caps in the table above.
Your drafts and approvals stay yours either way. If every Blotato call sits behind one server route, as Step 1’s spec asks, that route is where most of a provider switch would happen. Blotato’s REST API quickstart covers the key, account connection and a first test call, and the plan details are on the pricing page.
The same account powers the MCP server at https://mcp.blotato.com/mcp, so Claude Code can schedule into the same queue your calendar reads.
Sabrina’s Take: Build the Part Your Audience Sees
I’m biased, since I run Blotato, but the advice holds whoever’s API you use. Your scheduler’s value is the workflow you design around your own content, and none of that lives in the auth layer. Spend your time on the calendar and the approval flow, and let somebody else argue with TikTok’s audit team.
Build Your Own Social Media Scheduler FAQs
Can I build a social media scheduler with Claude Code?
Yes. Claude Code can build the calendar, composer and approval screens if you give it a short spec and the API docs. The hard part is platform access, not the code, so pair it with a publishing API instead of nine direct integrations.
Do I need my own developer app for TikTok and Instagram?
Only if you publish to them directly. TikTok’s guidelines rule out apps for personal use or for uploading to accounts you manage, and unaudited apps can only post privately. Instagram needs a professional account and Meta’s publishing permissions. A publishing API that has already passed those reviews removes the app-review step, but not the professional-account rule.
How do I handle time zones in a social media scheduler?
Store every time in UTC. Convert the user’s local pick to UTC when they schedule, and back to their timezone for display. Blotato’s create-post call has no separate timezone field and returns times in UTC.
What happens to scheduled posts if my scheduler goes offline?
The queue keeps running. A post you schedule through the API is held as a publishing job on Blotato’s side, not in your app, so it still goes out at its time without your calendar. A platform can still reject it, so check its status when your app is back.
Can I use the free trial to test the API?
No. The 7-day trial excludes the API, and generating an API key ends the trial and starts the paid Starter plan. Plan your build around a paid month rather than a free test.
Can other people use the scheduler I build?
Your app can give other people their own logins and approval screens, since that part is yours to design. What they can’t do is connect their own social accounts. The scheduler posts through one Blotato workspace, to the accounts you connect yourself.